A Simple Guide to Solar Power System Parts for Building a Portable Solar Setup
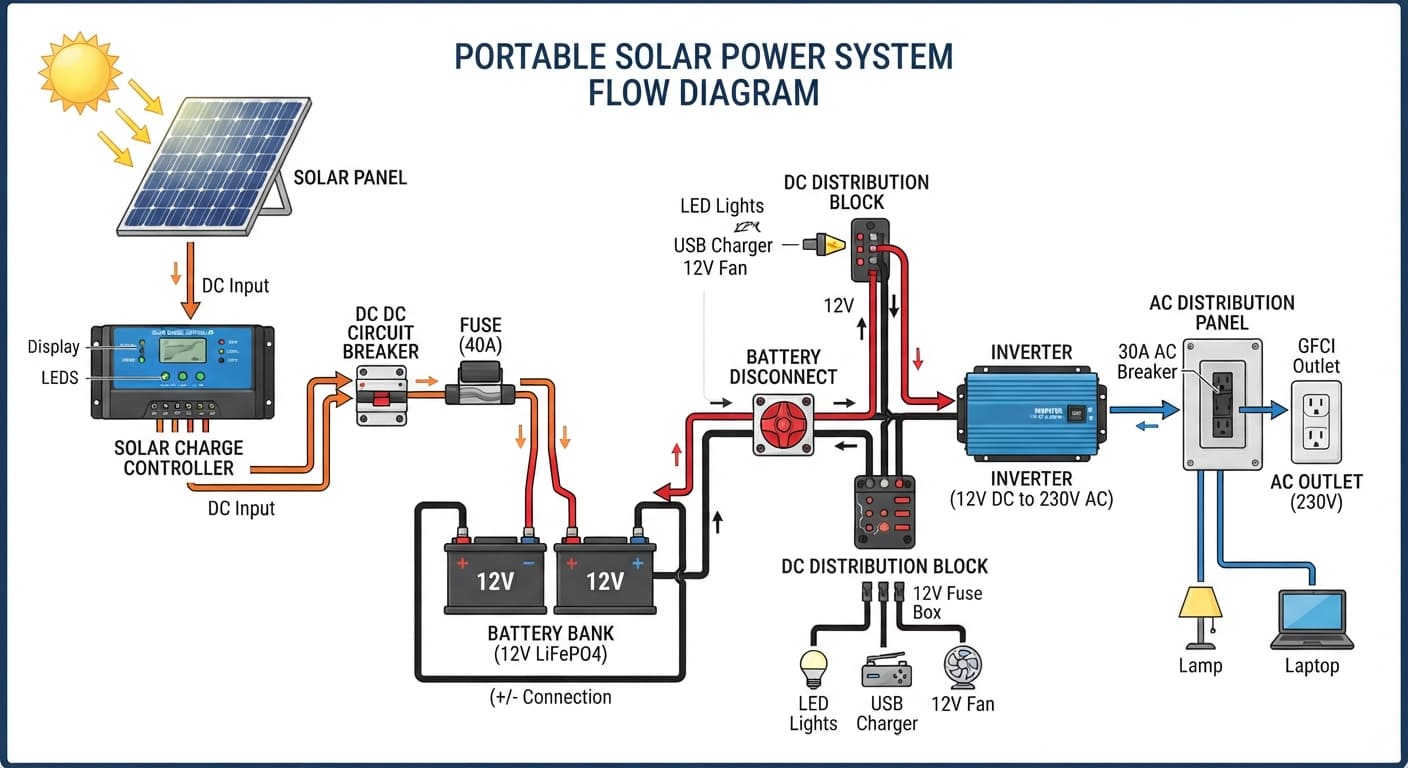
Solar Power System Parts are the separate components used to build, expand, or repair a portable solar setup. Instead of buying one all-in-one power station, you choose the panel, battery, charge controller, inverter, wiring, safety devices, and mounting gear that fit your actual power needs.
In a portable setup for camping, RV travel, vans, boats, cabins, tailgating, or emergency backup, these parts work together to collect solar energy, store it safely, and power DC or household AC devices.
If you’re just getting started, our portable solar power overview walks you through the fundamentals — from system sizing to real-world setups — before you dive into choosing individual parts. It’s the best place to begin if you want the big picture first.
What Are Portable Solar System Parts?
Portable Solar Power System Parts are often called (BOF) balance-of-system equipment. Solar panels produce electricity, but the other components make that electricity safe, usable, storable, and easier to control. The U.S. Department of Energy’s solar photovoltaic system design basics identifies batteries, charge controllers, power-conditioning equipment, safety equipment, and monitoring as typical stand-alone solar system equipment.
When selecting Solar Power System Parts, think of the setup as one connected electrical system rather than a cart full of individual products. Every component must be compatible with the system voltage, expected current, battery chemistry, and intended loads.
Popular Charge Controllers | Popular Deep-Cycle Batteries | Popular Inverters |
Core Components of a DIY Portable Solar Setup
| Component | What It Does | Needed? |
|---|---|---|
| Solar panel | Turns sunlight into DC electricity. | Yes |
| Charge controller | Regulates solar charging to protect the battery. | Yes, when charging a battery from a panel |
| Deep-cycle battery | Stores electricity for later use. | Usually |
| Inverter | Changes battery DC power into household-style AC power. | Only for AC devices |
| Cables and connectors | Carry power safely between components. | Yes |
| Fuses, breakers, and disconnects | Protect wiring and allow safe service. | Yes |
| Mounting and monitoring gear | Improves panel output, portability, and system visibility. | Recommended |
⚡Quick Guide – What Should You Buy?
| Your System Size | Recommended Charge Controller | Recommended Battery | Recommended Inverter |
|---|---|---|---|
| 50W–200W (camping) | 10A–20A MPPT (Renogy Rover, EPEVER) | 12V 50–100Ah LiFePO4 (Renogy, LiTime) | 300W–600W Pure Sine (Giandel) |
| 200W–600W (van/RV) | 20A–30A MPPT (Victron SmartSolar, Renogy Rover Li) | 12V 100–200Ah LiFePO4 (Renogy, Victron) | 1000W–2000W Pure Sine (Renogy, Victron Phoenix) |
| 600W–1500W (full-time off-grid) | 40A–60A MPPT (Victron 100/50, EPEVER 60A) | 12V 300Ah or 24V 100–200Ah (Victron, Renogy) | 2000W–3000W Pure Sine (Renogy 3000W, AIMS) |
| 1500W–3500W (cabins, workshops) | 60A–100A MPPT or hybrid inverter with built-in MPPT | 24V 200Ah+ or 48V 100Ah+ (Victron, DIY rack) | 3000W–3500W+ (Victron MultiPlus, AIMS 4000W) |
How System Parts Differ From Pre-Built Solar Generators
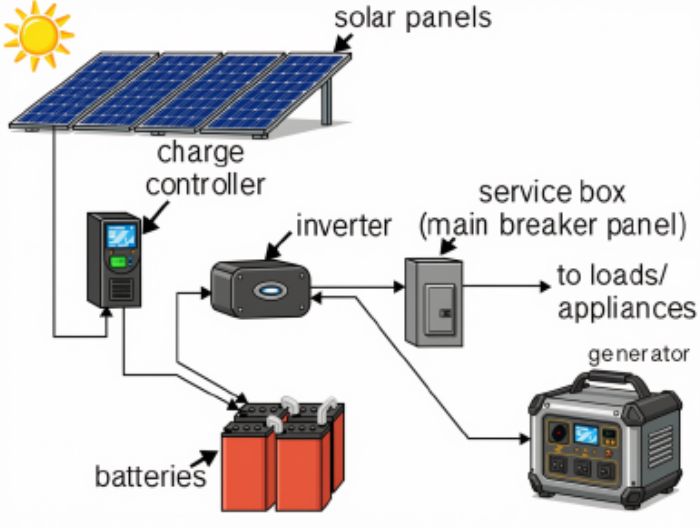
A pre-built solar generator, more accurately called a portable power station, combines a battery, inverter, charge controller, outlets, display, and protection devices in one enclosure. You may only need to add a compatible solar panel.
A DIY system uses separate Solar System Components. This takes more planning, but it gives you more usable battery capacity, easier repairs, upgrade options, and the ability to choose the right voltage, inverter size, cable length, and panel arrangement. Choosing individual Solar Power System Parts also makes it easier to replace a failed component without replacing the entire setup.
| Pre-Built Power Station | DIY Portable Solar System |
|---|---|
| Most major parts are built in. | Each part is selected and installed separately. |
| Fast to use, limited to built-in capacity. | More setup work, easier to scale. |
| Repairs can be difficult or impractical. | Individual batteries, controllers, and inverters can be replaced. |
| Connector and solar-input limits are fixed. | System design can match your panels and loads. |
Solar Panels: Foldable, Rigid, and Flexible
A solar panel is the energy source for your system. Photovoltaic cells convert sunlight into electricity, and multiple cells are connected inside a panel or module. The Michigan Saves solar panels 101 guide provides helpful background on photovoltaic technology and how solar cells produce electricity.
| Panel Type | Best For | Main Trade-Off |
|---|---|---|
| Foldable or suitcase panel | Camping, temporary use, chasing sunlight | Requires setup and storage space |
| Rigid framed panel | RV roofs, trailers, boats, ground stands | Bulky and less convenient to transport |
| Flexible panel | Curved or weight-sensitive surfaces | Usually has less airflow and may have a shorter service life |
Choose panel wattage based on daily energy use, available space, and realistic sunlight. Check each panel’s open-circuit voltage, listed as Voc, before connecting it to a charge controller. Cold temperatures can raise Voc, so the full array Voc must stay below the controller’s maximum PV-input voltage.
Essential Solar Power System Parts and Components
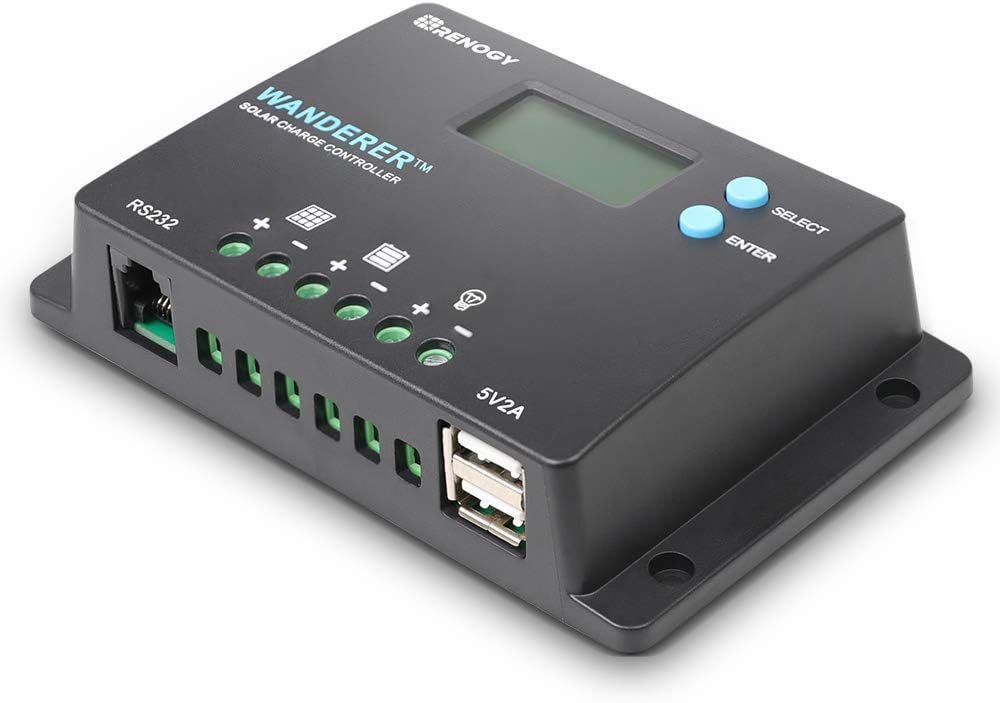
Solar Charge Controllers
A solar charge controller sits between the panel and battery. It regulates charging, prevents battery overcharging, and may disconnect loads when battery voltage becomes too low. A controller is essential whenever a solar panel charges a battery directly.
Among all Solar Power System Parts, the controller is one of the most important compatibility checkpoints because it must safely handle both the solar array input and the battery charging profile.
MPPT vs. PWM Charge Controllers
| Controller Type | Best Use | Key Point |
|---|---|---|
| MPPT | Most expandable portable systems, higher-wattage arrays, and long cable runs | Can accept higher panel voltage and convert it efficiently for battery charging. |
| PWM | Small, simple systems with closely matched panel and battery voltage | Usually less expensive but less flexible and less efficient. |
MPPT controllers track the panel’s best operating point and can step higher PV voltage down to battery charging voltage. PWM controllers work best when panel voltage closely matches the battery bank. Check the controller’s battery-voltage range, maximum PV voltage, maximum charging current, supported battery chemistry, and temperature-sensor options.
Charge Controller Compatibility Checklist
- Match the controller to your battery bank voltage: 12V, 24V, or 48V.
- Confirm it supports lithium, AGM, gel, flooded lead-acid, or your specific battery type.
- Keep total panel Voc below the controller’s maximum PV-input rating.
- Choose an output-current rating that can handle your planned solar array.
- Use the manufacturer’s recommended fuse, wire size, and connection order.
Solar Storage Battery
The battery stores solar energy for use after sunset, during clouds, or whenever demand is higher than panel output. Use a deep-cycle battery designed for repeated charging and discharging. Do not use a standard automotive starter battery as the main storage battery.
The battery often determines the real-world capability of your Solar Power System Parts. A larger panel can replenish energy faster, but battery capacity determines how long you can run loads when sunlight is unavailable.
| Battery Type | Good Fit For | Considerations |
|---|---|---|
| LiFePO4 lithium | Most portable solar systems | Lightweight, long cycle life, fast charging; verify BMS and low-temperature charging protection. |
| AGM lead-acid | Budget builds and moderate-use systems | Sealed and simple, but heavy with less usable capacity. |
| Flooded lead-acid | Fixed, well-ventilated installations | Lower upfront cost but requires maintenance and ventilation. |
- Battery capacity is usually shown in amp-hours (Ah).
- To estimate how much energy a battery can store in watt-hours (Wh), you multiply:
Battery voltage (V) × Amp-hours (Ah) = Watt-hours (Wh)
Example:
A 12V, 100Ah battery:
12 × 100 = 1,200 Wh
So it can store about 1,200 watt-hours of energy (before losses and limits).
Verify the battery’s continuous discharge rating, maximum charge current, recommended charging voltages, and operating temperature. For lithium batteries, do not charge below the battery manufacturer’s approved temperature range unless the battery has built-in heating or other approved protection.
Solar Inverters
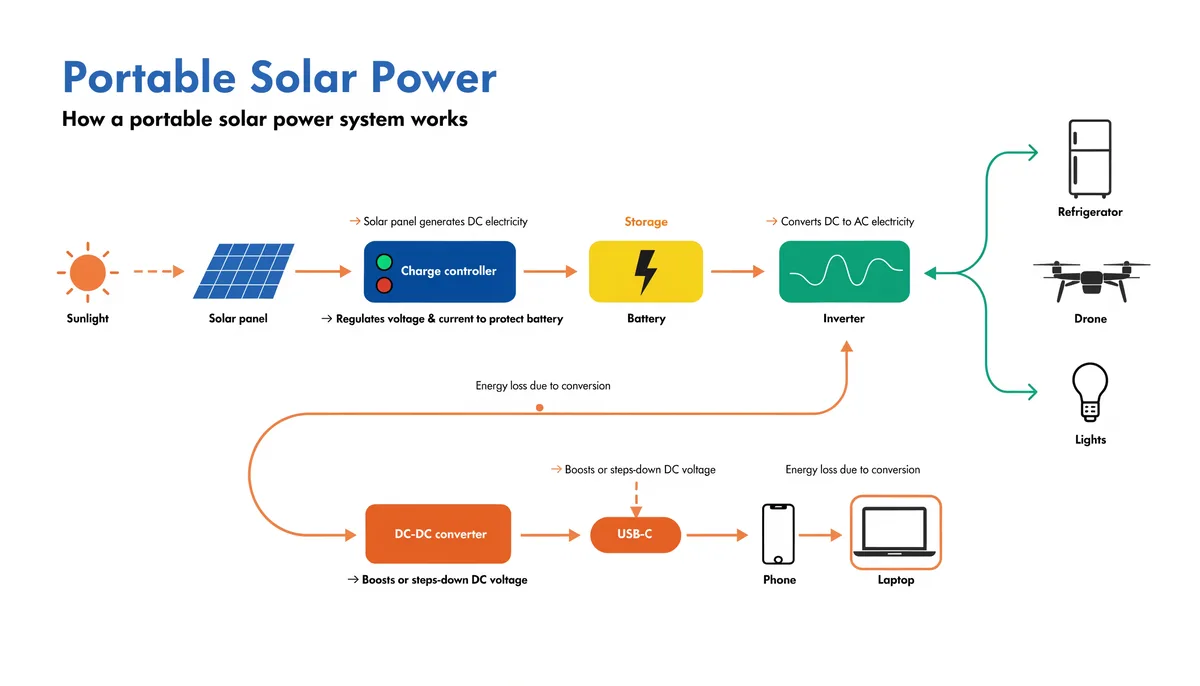
An inverter converts battery DC power into 120V AC power for household-style devices such as laptop chargers, tools, kitchen appliances, and medical equipment. It is not needed for devices that can run directly from DC, USB, or a regulated DC-to-DC converter.
Choose a pure sine wave inverter for sensitive electronics, modern appliances, and motors. Match the inverter’s DC input voltage to the battery bank exactly. A 12V inverter requires a 12V battery bank; a 24V inverter requires a 24V battery bank.
- Size continuous inverter output above your expected running load.
- Check surge rating for compressors, pumps, and motor-driven tools.
- Use short, correctly sized battery cables because inverter current can be very high.
- Install the required fuse close to the battery’s positive terminal.
- Use DC loads directly when practical to reduce inverter losses.
Wiring, Connectors, and Cables
Wiring is one of the most important Solar Energy System Components. Undersized cable can cause voltage drop, heat, poor charging, damaged equipment, or fire risk. Select wire size based on current, cable length, insulation rating, installation environment, and the manufacturer’s instructions.
Reliable wiring and terminations are Solar Power System Parts that deserve the same attention as panels and batteries. Even a well-sized system can perform poorly if cable losses, loose connections, or improperly crimped terminals restrict power flow.
Solar Extension Cables and Adapter Types
| Connector Type | Typical Use | Important Check |
|---|---|---|
| MC4 | Most rigid and portable solar panels | Use compatible connectors and correct polarity. |
| XT60 | Portable power stations and smaller DC systems | Check voltage, current, polarity, and device-specific wiring. |
| Anderson | High-current DC connections, battery boxes, portable panels | Confirm the connector series, contact rating, and polarity. |
| Ring terminals | Battery, controller, fuse, and inverter connections | Match stud size, wire gauge, and terminal material. |
Never assume an adapter makes two products electrically compatible. Confirm connector polarity, voltage limits, current rating, and the input specifications of the charge controller or power station. Avoid mixing different MC4 connector brands unless the manufacturers specifically list them as compatible.
Parallel and Y-Branch Cables for Multiple Panels
Y-branch connectors combine panels in parallel. Parallel wiring keeps voltage about the same while increasing available current. Series wiring increases voltage while current stays about the same. Series-parallel wiring combines equal series strings to increase both array voltage and current.
Your wiring method must stay within the charge controller’s PV voltage and current limits. Series connections are common with MPPT controllers because higher voltage can reduce loss over longer cable runs. Parallel arrays need wiring, connectors, and overcurrent protection sized for the combined current.
Battery and Inverter Wiring Basics
- Use fine-strand copper cable rated for DC use and the installation environment.
- Keep battery-to-inverter cables as short as practical.
- Install a properly rated fuse on the positive battery conductor near the battery.
- Use crimped ring terminals, heat shrink, strain relief, and terminal covers.
- Follow polarity markings carefully: positive to positive and negative to negative.
- Do not run unprotected cables through sharp metal openings or moving areas.
- Use a DC fuse block for multiple 12V loads instead of stacking many wires on one battery terminal.
Mounting and Positioning Gear
Portable Stands and Tilt Mounts
Portable stands let you aim a panel toward the sun instead of laying it flat. Tilt mounts can improve output when the sun is low, especially in winter. Choose stands that are stable, corrosion-resistant, and easy to secure against wind.
Mounting accessories may seem secondary, but they are practical Solar Power System Parts for anyone who moves camp frequently or wants to improve panel exposure throughout the day.
- Keep panels clear of shade from trees, roof vents, antennas, and gear.
- Leave air space behind rigid panels when possible to reduce heat buildup.
- Secure portable panels before leaving camp or walking away.
- Do not place panels where people can step on cables or trip over stands.
RV, Boat, and Balcony Mounting Options
| Location | Common Mounting Approach | Key Concern |
|---|---|---|
| RV roof | Z-brackets, rails, or vehicle-specific mounts | Waterproof roof penetrations and wind load |
| Boat | Rail mounts, rigid frames, or marine hardware | Salt corrosion, vibration, and cable protection |
| Balcony | Approved railing or freestanding mounts | Building rules, wind exposure, and falling hazards |
| Ground setup | Folding stand or portable frame | Theft, wind, foot traffic, and cable routing |
Permanent mounting on an RV, boat, or building should follow the vehicle manufacturer’s guidance, local requirements, and the mounting hardware instructions. Do not drill through a roof or hull without a proper sealing and structural plan.
Safety and Protection Accessories
Safety devices are not optional extras. They protect wires and equipment from overcurrent, make maintenance safer, and help isolate a fault. The exact protection plan depends on your voltage, battery chemistry, inverter size, cable size, installation location, and local electrical rules.
Fuses, disconnects, and correctly rated breakers are critical Solar Power System Parts, particularly in battery circuits where high DC current can create serious heat and fire hazards. For broader electrical safety information, review the National Fire Protection Association’s electrical safety resources.
Fuses, Circuit Breakers, and Disconnect Switches
| Device | Purpose | Typical Location |
|---|---|---|
| Battery fuse | Protects battery cables and connected equipment. | Near the positive battery terminal |
| PV fuse or breaker | Protects solar conductors and isolates the array. | Between solar array and charge controller, as required |
| Battery disconnect | Allows the battery bank to be isolated for service or storage. | Accessible near the battery |
| DC load fuse block | Protects individual 12V or 24V circuits. | Between battery and DC loads |
| AC breaker or GFCI outlet | Protects inverter-fed AC circuits and users. | At the AC distribution point |
Size fuses to protect the wire and equipment, not simply to stop nuisance trips. Use DC-rated protection devices for DC circuits. Follow every equipment manufacturer’s specified fuse rating. Solar-controller manuals commonly require battery-side fusing and a way to disconnect PV conductors before service.
Surge Protection and Grounding Kits
Surge protective devices can help protect equipment from voltage spikes, especially on permanently mounted exterior arrays or exposed systems. Use units rated for the correct DC or AC voltage and install them as directed by the manufacturer.
Grounding and bonding are installation-specific. A portable panel on the ground does not automatically need the same grounding arrangement as an RV roof array, a boat system, or a building-mounted system. Follow the inverter, controller, vehicle, and local-code instructions. Get a qualified electrician or marine/RV solar technician involved when requirements are unclear.
Monitoring and Expansion Tools
Battery Monitors and Solar Charge Displays
A battery monitor tracks voltage, current, power, and estimated state of charge. A shunt-based monitor is usually more useful than voltage alone because battery voltage can be misleading while charging or under load.
Charge controller displays and Bluetooth apps can show panel voltage, solar watts, charging amps, daily yield, battery status, and fault codes. Monitoring helps you spot shaded panels, loose connections, low battery capacity, or unexpected inverter loads before they become bigger problems.
Adding Extra Panels or a DC-DC Charger
You can expand most DIY systems by adding panels, battery capacity, DC circuits, or an alternator charging source. Before adding anything, confirm the limits of your existing Solar Power System Parts: controller PV voltage, controller output current, battery charge-current limit, cable ampacity, fuse ratings, and inverter capacity.
Planning for expansion early helps ensure your Solar Power System Parts can grow with your needs. For example, selecting an MPPT controller with extra current capacity may allow you to add another panel later without replacing the controller.
DC-DC Chargers for Vehicles
A DC-DC charger charges your house battery from a vehicle alternator while controlling voltage and charge current. It is useful in vans, RVs, overland rigs, and boats with an engine. Many models also accept solar input, which can simplify a mobile charging system.
- Match the charger to the vehicle electrical system and house-battery chemistry.
- Use properly sized alternator-side and battery-side fuses.
- Confirm whether an ignition trigger or smart-alternator setting is needed.
- Do not assume an alternator can safely support any charger size.
Quick Checklist: Building Your System
Minimum Parts for a Basic Portable Solar Setup
| For a Battery-Charging DC System | Add This If You Need 120V AC Power |
|---|---|
|
|
This minimum list covers the essential Solar Power System Parts for a small battery-charging setup. Add only the equipment required for your loads, but never omit the protection devices and properly sized wiring needed for safe operation.
Common Mistakes to Avoid When Choosing Components
- Buying parts before calculating daily energy use and peak load.
- Connecting a panel array with Voc higher than the controller allows.
- Using an inverter with the wrong battery-bank voltage.
- Choosing cables by guesswork instead of current and length.
- Skipping fuses, disconnects, terminal covers, or strain relief.
- Using MC4, XT60, or Anderson adapters without checking polarity and ratings.
- Mixing old and new batteries with different capacity, chemistry, or age.
- Charging a lithium battery below its approved temperature range.
- Adding panels without checking charge-controller capacity.
- Mounting panels where shade, heat, wind, or roof leaks reduce performance.
Choose Compatible Solar System Components First
The best portable setup is not the one with the most parts. It is the one with compatible Solar Energy System Components that safely support your panels, battery, loads, and future upgrades. Start with your daily watt-hour needs, decide whether you need DC only or AC power, then select each component around the same battery voltage and electrical limits.
Build in this order: battery voltage, battery capacity, inverter needs, solar-panel wattage, charge controller, wiring, protection devices, and mounting gear. This approach makes your Solar Power System Parts easier to install, maintain, troubleshoot, and expand.
Taking time to compare specifications before buying Solar Power System Parts can prevent expensive mismatches and make your portable system safer, more reliable, and more useful for years to come.